
How to create an EC2 instance in AWS
Introduction
AWS EC2 (Elastic Compute Cloud) instances are cloud computing services known for their flexibility and scalability. By leveraging EC2 instances, you can quickly and efficiently provide the necessary compute resources. In this blog, we will provide a detailed explanation of how to launch EC2 instances. Whether you are new to using EC2 instances or looking for more advanced configurations and the latest best practices, this practical guide will be beneficial to you.
Advantages of EC2 instances
① Flexibility and Scalability:
EC2 instances allow you to launch the exact number of instances you need, precisely when you need them. This enables flexible scaling, allowing you to increase or decrease the number of instances based on fluctuating demand.
② Wide Range of Instance Types:
EC2 provides a variety of instance types to cater to different requirements such as performance, memory, and storage. This allows you to choose the instance type that best suits your specific workload.
③ Diverse Storage Options:
With EC2 instances, you have access to a range of storage options. By combining storage services like Elastic Block Store (EBS) and Simple Storage Service (S3), you can fulfill various needs such as data retention, backups, and database storage, among others.
Steps for launching an EC2 instance
※ These steps might slightly differ from the scrolling order on the EC2 console※
(1)Setting the EC2 instance
Select “EC2” from the services available in the AWS Management Console.
From the EC2 instance menu, click on “Launch Instances.”

(2)Choosing an AMI
For this example, we used the default Amazon Linux 2 AMI (HVM), SSD Volume type, but you are free to choose any AMI that might suit you.

(3)Choosing an instance type
We selected the t2.micro instance, which is available within the free tier. Now, let’s move on “Configure Instance Details” .
A t2.micro instance is one of the instance types offered by AWS EC2. It falls under the general-purpose category and is a part of the T2 instance family. Here are some key details about the t2.micro instance:
- CPU Performance: It provides baseline performance with the ability to burst for short periods of time. The CPU performance is measured in Amazon EC2 Compute Units (ECUs).
- Memory: The t2.micro instance comes with 1 GiB of RAM.
- Storage: By default, it is configured with Amazon Elastic Block Store (EBS) as the root volume for storage. You can also attach additional EBS volumes as per your requirements.
- Free Tier Eligibility: The t2.micro instance is eligible for the AWS Free Tier, allowing you to use it for a limited amount of time at no additional cost.
It’s important to note that the t2.micro instance is suitable for lightweight applications, small workloads, and for getting started with AWS services. If you have specific requirements or anticipate higher resource demands, you may need to consider other instance types with more resources.

(4)Instance detailed settings
To proceed, please follow these steps:
- Select the appropriate VPC (Virtual Private Cloud) and public subnet from the available options.
- Enable the option for “Auto-assign Public IP” to ensure that the instance is assigned a public IP address.
- Leave the other settings as default for now.
- Add Storage to proceed to the next step.

(5)Add storage
We will use the default 8GB SSD for this example.

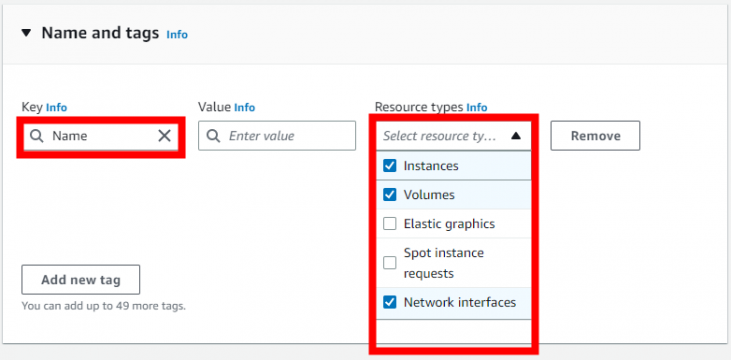
(6)Add a tag
This helps you to know what instance you are dealing with just by looking at the name. For this example, we added the tag “name”.
(7)Setting a security group
Select “Create a new security group.”
Enter a name and description for the security group, based on your purpose or naming convention.
Add an inbound rule for remote connections. Select the type as “SSH” and set the source as “My IP.” This allows SSH access only from your IP address.
Once you have configured the security group, review your instance information.

(8)Checking your EC2 instance before launching
Please review the instance type, security group settings, and other details carefully. Once you have ensured that everything is correct and as per your requirements, click on “Launch” to initiate the instance creation process.

(9)Setting a key pair
In AWS EC2, a key pair is a security credential that consists of a public key and a private key.
- Public Key: The public key is used for encrypting data and is placed on the EC2 instance. It allows secure access to the instance by encrypting login information and enabling secure communication.
- Private Key: The private key is known only to you and is used for decrypting data that was encrypted using the corresponding public key. It is used to authenticate your identity when connecting to the EC2 instance.
When you create a key pair, you generate a public and private key pair. The private key is downloaded and stored securely on your local machine, while the public key is associated with the EC2 instance. When you connect to the instance using SSH (Secure Shell) or other methods, you need to provide the private key for authentication.
Key pairs are crucial for securing your EC2 instances and ensuring that only authorized individuals can access them. It’s important to keep the private key secure and not share it with others.

(10)Checking your instance status
The instance launch process may take a few moments. Once it’s complete, you will see the status “Running” and “2/2 checks passed” indicating that the instance has been successfully created.

Conclusion
In this blog post, we have provided a detailed explanation of the steps involved in launching an EC2 instance. We have covered the fundamental steps and important points to consider when launching an EC2 instance. It’s worth noting that AWS continually offers new features and services, and the world of cloud computing is constantly evolving. We encourage you to explore AWS’s official documentation and training resources to further enhance your knowledge and stay updated with the latest advancements in the field.

